The Advanced Garden: A Survival Perma-Garden
In a long-term disaster, stored food will eventually run out. If you are staying in place and have seeds or seedlings, start growing food as soon as possible.
Do not wait for perfect conditions. Start small, learn what grows, save seed, and expand. A productive survival garden is built over time.
The goal of a perma-garden is simple: catch water, build soil, protect the ground, and keep producing food with as few outside supplies as possible.
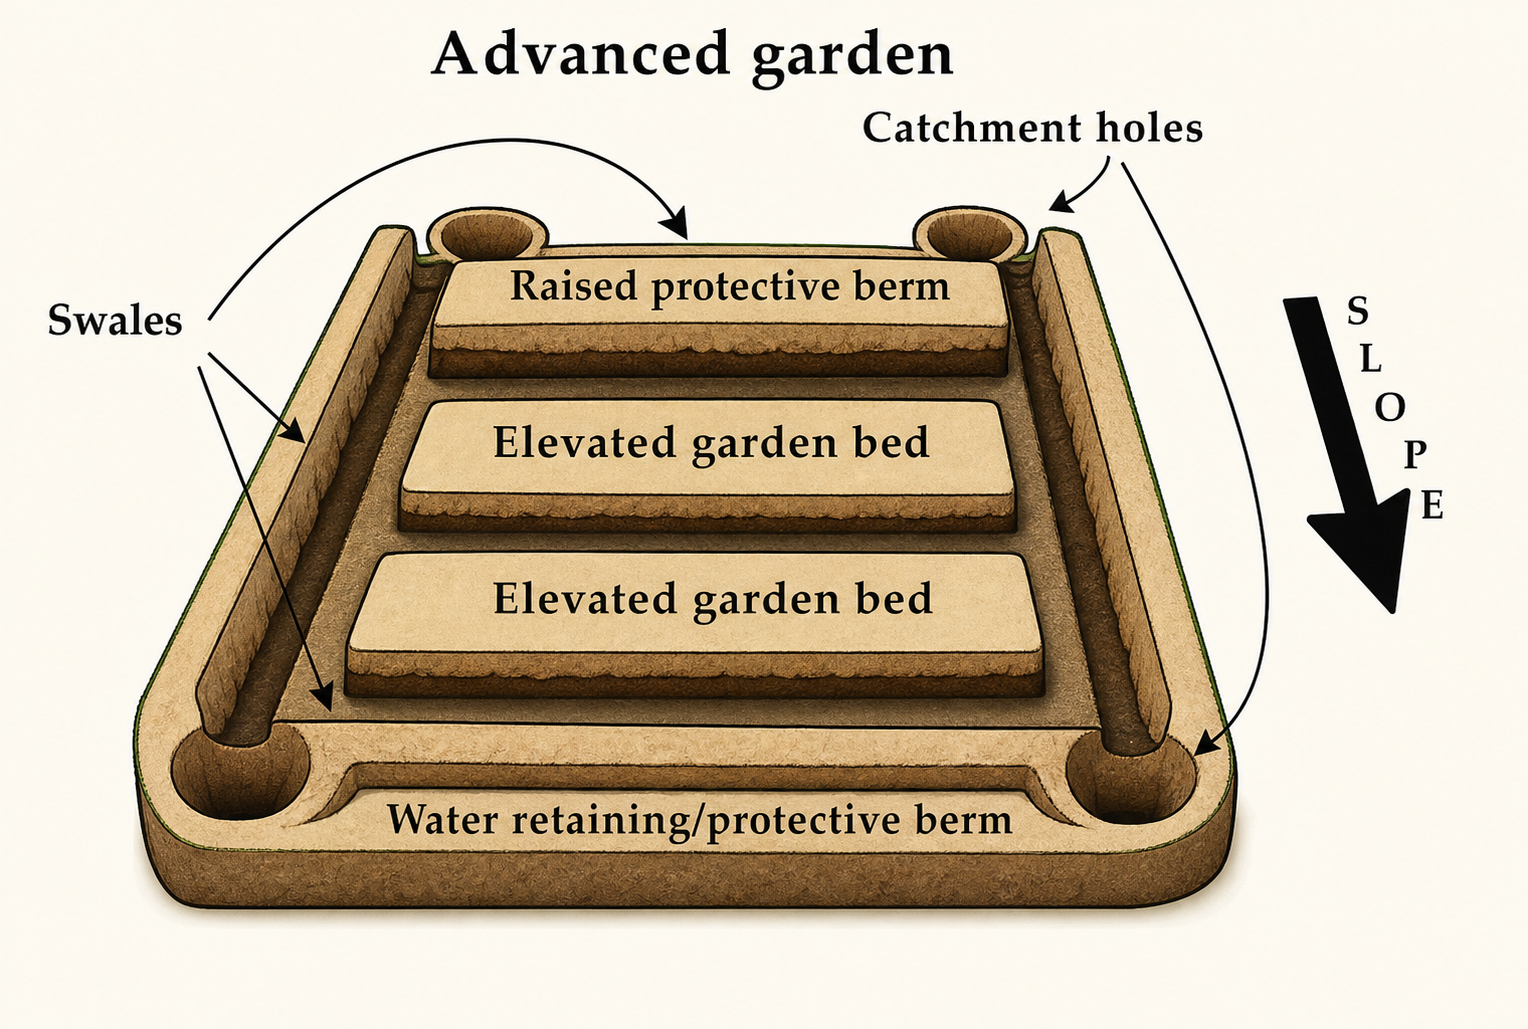
The Advanced Garden is a practical survival version of a perma-garden. It combines elevated growing beds with swales, catchment holes, and protective berms. The layout is designed to hold useful rainfall in the soil while giving excess water a controlled path around the beds.
The garden should be built on level or nearly level ground. A slight downhill grade can help direct excess water toward the lower catchment holes, but a steep or obvious slope is not needed. The swales and catchment holes are intended primarily to hold water and let it soak into the surrounding soil—not to drain the garden rapidly.
If the site has no natural slope, the trenches and deeper overflow holes can still collect excess water effectively.
Pick the Best Location You Have
Use ground that receives good sunlight and is close enough to protect, water, and work every day. Avoid obvious contamination, standing sewage, and places where floodwater collects.
Think about security. A garden is valuable. A fence, thorny plants, camouflage, or several smaller plots may be better than one large garden that can be seen from a distance.
Improve the Soil With Biochar
Biochar is charcoal added to soil. Its pores help hold water, nutrients, and soil organisms. It can remain in the ground for a very long time.
Biochar may improve a garden, especially when combined with compost, but it is not magic fertilizer. Try it in one section first and compare the results.
Make Biochar
Use clean, untreated wood. Do not use painted or pressure-treated lumber, plywood, plastic, trash, or charcoal briquettes. You do not want their chemicals in your food soil.
Dig a cone-shaped pit or a V-shaped trench. Start a fire in the bottom. As each layer of wood burns and begins to turn white on the surface, add another layer. The new wood reduces the oxygen reaching the layer below, turning it into charcoal instead of ash.
When you have enough char, quench it completely with water or smother it with soil. Make certain no hot embers remain.
Once cool, moisten and crush the charcoal into pieces ranging from pea-sized down to coarse grit. It does not need to be powder.
Charge It Before Use
Fresh biochar can soak up nutrients that your plants need. Charge it first.
Mix one part biochar with about one part finished compost. Add enough water to keep it moist and let it sit for at least 10 days. Longer is better if you have time.
Then mix it into the upper part of the garden soil. Start with a modest amount. You can always add more later.
Make Compost
Compost turns waste into garden fertility. A working pile needs four things:
- Browns: Dry leaves, straw, shredded cardboard, and untreated sawdust.
- Greens: Grass clippings, coffee grounds, manure, weeds that have not gone to seed, and fruit or vegetable scraps.
- Water: Keep the pile damp like a wrung-out sponge.
- Air: Turn the pile occasionally so it does not become a wet, rotten mass.
Add a little healthy soil or old compost to help start the process. Eggshells can go in too, although they break down slowly.
Avoid plastics, chemicals, treated wood, and dog or cat waste. Meat, grease, bones, and dairy attract animals, so leave them out unless you have a secure composting system.
A good pile heats up. Turn it when it begins to cool. The compost is ready when it is dark, crumbly, smells like soil, and no longer heats up after turning. This may take a few months.
The Advanced Garden Water System
Rain that runs away is wasted. The Advanced Garden shapes the ground so water slows down, spreads through the surrounding soil, and reaches crop roots.
The trenches, or swales, are not intended to remain full of water. Their main purpose is to temporarily catch rainfall and give it time to soak into the ground.
The catchment holes provide additional capacity during heavy rain:
- Dig swales around the garden, including along the uphill side, so water has time to soak into the soil.
- Place smaller catchment holes at the upper corners. These collect water and help it soak into the uphill side of the garden.
- Run the side swales toward the lower catchment holes.
- Make the lower catchment holes deeper than the upper holes. They provide additional storage when the soil and trenches can no longer absorb the water quickly enough.
- Leave clear openings where the side trenches enter the lower holes so excess water can flow into them without being blocked by the surrounding berm.
- Use soil removed from the swales and holes to form protective berms.
- Direct any final overflow away from buildings, paths, and anything that could be damaged.
- Cover exposed soil with leaves, straw, grass, or another available mulch.
Mulch is one of the easiest ways to save water. It shades the soil, slows evaporation, reduces weeds, and adds organic matter as it breaks down.
Watch the garden during heavy rain. If water cuts a channel, use soil, rocks, branches, or mulch to slow it. If a hole remains full for days, make it shallower, improve its overflow path, or move vulnerable plants to higher ground.
Build the Elevated Garden Beds
Create elevated beds that can be reached from the sides. Use the space between them as walking paths. Do not walk on the growing soil.
If the ground is hard, loosen it deeply with a fork. Keep the better topsoil on top instead of mixing poor subsoil throughout the bed.
Elevated beds help define the growing area and protect it from foot traffic. They can also improve drainage when the ground becomes saturated.
In extremely hot or dry country, do not raise the beds so high that they dry out rapidly. The ideal height depends on the soil, rainfall, and available water.
Plant in offset or triangular patterns instead of widely spaced single rows. This fits more plants into the bed and creates a canopy that shades the soil. Do not crowd plants so tightly that they cannot receive sunlight or airflow.
Grow for Survival
Grow foods that provide calories, store well, and perform in your climate. Depending on your area, that may include potatoes, sweet potatoes, dry beans, corn, squash, grains, onions, cabbage, carrots, turnips, beets, and hardy greens.
Do not risk all your seed at once. Plant part of it, keep part in reserve, and make another planting later. A late frost, drought, flood, pest, or simple mistake can destroy the first crop.
Grow more than one crop and more than one variety. Diversity keeps a single disease, pest, or weather event from wiping out everything.
Combine quick-growing vegetables with crops that provide more calories or store well. Greens may produce food quickly, while beans, corn, potatoes, squash, and root crops can provide more substantial long-term value.
Save seed from your healthiest plants. Let the seed mature fully, dry it well, label it, and store it somewhere cool, dark, dry, and safe from rodents.
Rotate Crops
Moving crops helps prevent soil exhaustion and breaks some pest and disease cycles.
A simple rotation is:
- Legumes: Peas and beans.
- Leaf and heavy-feeding crops: Lettuce, spinach, cabbage, and corn.
- Fruiting crops: Tomatoes, peppers, cucumbers, and squash.
- Root crops: Onions, carrots, beets, and turnips.
Move each group to a different bed the following season.
Also remember plant families. Tomatoes, peppers, potatoes, and eggplants are related and can share diseases. Cucumbers, melons, pumpkins, and squash are another family. Do not replace one family member with another in the same bed if you can avoid it.
Add compost between crops when available. Plant legumes and cover crops in tired ground. Remove badly diseased plants instead of composting them.
Start Before the Emergency
Seeds alone do not create food security. Gardening requires soil, water, tools, protection, timing, knowledge, and practice.
Start now. Learn which crops survive your weather. Learn how much water they need, which pests attack them, how to save their seed, and how to cook and preserve the harvest.
The Advanced Garden does not have to be large or perfect. Its value comes from combining several simple ideas into one working system:
- Permanent growing beds
- Improved soil
- Water-catching swales
- Upper infiltration holes
- Deeper lower overflow holes
- Protective berms
- Mulch
- Crop diversity
- Seed saving
- Crop rotation
Do not worry about building the perfect system. Build a working one. Improve the soil every season, catch every useful drop of water, protect your seed, and keep planting.
That is how a patch of ground becomes an Advanced Garden—and how an Advanced Garden becomes a working survival perma-garden.